Welcome back geeks, so after pasting this code, you would be having the MainActivity.java file like this :
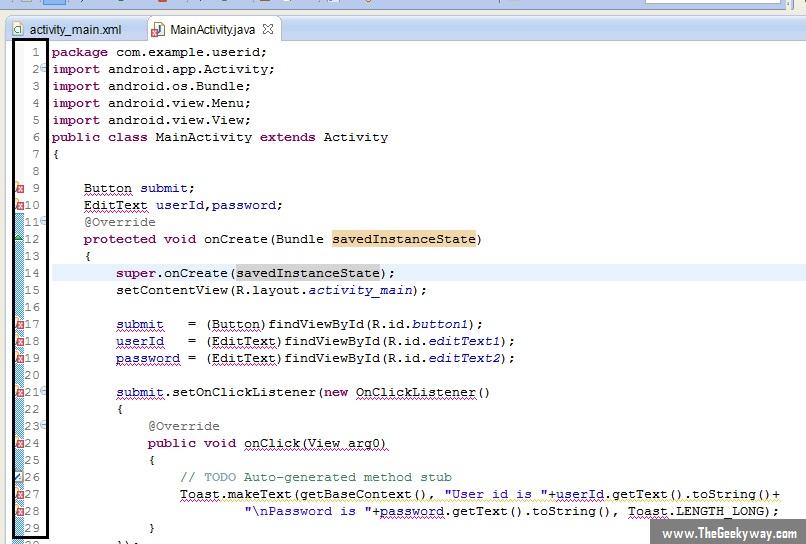
In this screenshot, notice the highlighted part on the left. The Eclipse IDE is showing some errors at some specific lines (line no. 9 10,17,18 and so on). Now we’ll use Quick Fix feature of Eclipse to include necessary classes.
- Click on left corner of line no. 9 and Eclipse with provide fixes for this error. Click on the first solution, i.e. import android.widget.Button.
- Similarly click on left corner of line no. 10 to import android.widget.EditText. So now two of required classes have been imported, you will notice that in import statements.
- Click on left corner of line no. 21 to import View.OnClickListener (third solution to import android.view.View.OnClickListener)
- Click on left corner of line no. 27 to import android.widget.Toast.
So now our necessary packages and classes have been imported and we can start understand the actual code.
First we create a button reference and two edit text references globally within the class. This part required no explanation. Inside the onCreate method we map all of them to the layout file which we had created. We use the method findViewById to find the components by their ID as defined in the XML file. So we map the Button and two EditTexts with their respective IDs.
Next we add an onClickListener to the button. This is similar to the ActionListener from Swing API. It defines the action to be performed when the button is clicked. We have used the anonymous inner class version of this method. Alternatively, we may even use implement keyword to implement OnClickListener interface and define the required method ( public void onClick() ).
The onClick() method takes a View as an argument. As discussed previously also, View is directly or indirectly superclass of all android components. So we can use the View parameter to obtain view Id, and other properties of the View which generates the event.
Inside the method we call makeText method of the Toast class. This method is used to create a simple dialog like view which displays the input. This is similar to JOptionPane class from Swing API where we have few ready-made dialogs. The arguments inside Toast method specify the application context, the string to be displayed and the time for which the dialog is displayed (Toast.LENGTH_SHORT). In the end, show method is called from the Toast context to show this dialog which we have just created.
So this is how this simple application works. This was an effort to introduce the onClickListener to our audience. Similarly different components have different type of listeners like onCheckedChangedListener for toggle based events.
Execute the application on Android Virtual Device, Bluestacks or directly on your phone. This application when executed on AVD 4.3 gives the following output :

Posted By: Sanyam Khurana

The Geeky Way is founded by Sanyam Khurana. He graduated from Georgia Tech, Atlanta, US with a Master's degree in Computer Science. He goes by 'CuriousLearner' all over the web & has spoken at many international conferences. He likes to contribute to FOSS. He is listed as an individual contributor of the Django project, bug-triager for CPython & has his name listed in the credits section of every browser ever released by Mozilla. In his free time, he likes to improve his guitar skills or binge-watch series.. You can find him on Twitter