Asp.net Basics : Uploading a file in asp.net using validations (Part 1 of 5)
Posted on Sat 04 January 2014 by Deep_Singh in ASP.NET

Contents of this 5 part tutorial
Part 1 : Basics of ASP.Net file uploading, uploading a file to a server.
Part 2 : ASP.Net file uploading using EmptyFile Validations.
Part 3 : ASP.Net file uploading using FileSize validation.
Part 4 : ASP.Net file uploading using FileExtension validator.
Part 5 : Complete ASP.Net file uploading using all the Validations one at a time.
This is the Part 1 of the 5 part tutorial on how to upload file onto the server using asp.net and validate the file.
File Upload in asp.net : Basics
Following controls are required for uploading a file to server using asp.net
- File upload control : It will only be used to select file which will be uploaded on server, it will not be used to upload the file.
- Button : To upload a file we need a button, drag and drop the button on the screen from toolbox and change the button name to "Upload File".
- A label control : To display the status of the upload.
File Upload in asp.net : v1.0 (no validations used, the file will be uploaded as it is)
This is the basic form of file upload, where no validations are being used, user can upload as much large file as possible. But one thing must be noted that this method should be strictly avoided as there is no validations used in this method (validations explained in v1.1 and v1.2) and can be a subject to DDoS attacks (Denial of service) and can shut down the server. This code is just to show how to upload a file and save it on server.
Here is the back end structure I am using on Microsoft Visual Studio 2008.
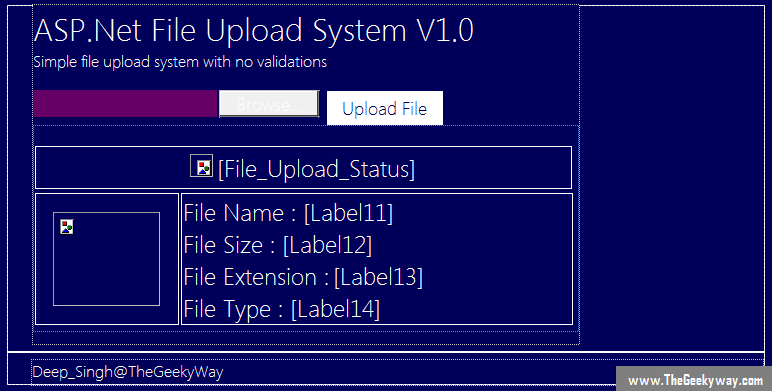
Here a file upload control is used which is used to select the file and an upload button which will upload the file. The second row will display the characteristics of the file, whether the file is a ".pdf" or a ".doc" (and other extensions) file and display the image of file type. The second row is being hidden with a panel until the file isnt uploaded.
Let us take a ".pdf" file which will be uploaded on the server under the "uploads" folder. The main code used for uploading a file onto server is :-
.
.
FileUpload1.SaveAs(Server.MapPath("~/uploads/" + FileUpload1.FileName));
.
.
Complete explanation of the code :-
FileUpload1 : The contol name of the FileUpload in toolbox, administrators can use any file name.
SaveAs : Its the method found in System.Web.UI.WebControls namespace and in System.Web (System.Web.dll) assembly, its main purpose is to save the file on the server.
MapPath : This method is used to return the complete physical path for the virtual path that you pass in the method.
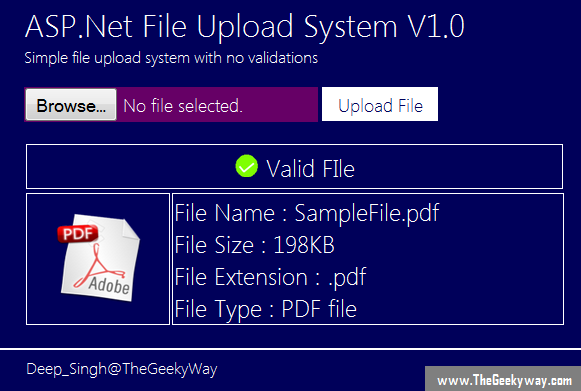
Now let us upload a file on the server for example "SampleFile.pdf" is being uploaded on the server. The output once the file is uploaded is :-
The complete cs code for v1.0 is (remember this doesn't use any validations, only retrieves the name and the file extension of the file) :-
protected void Page_Load(object sender, EventArgs e)
    {
        // Hiding the panel in the page load
        Panel1.Visible = false;
    }
    protected void Button1_Click(object sender, EventArgs e)
    {
        //calling the valid_file method, if the return value is not 1 then file doesnot exist
        int validate = validate_file();
        if(validate == 1)
        {
            // Getting all the file details
            GetFileDetails();
            // If file exist then the file will be saved in the virtual directory
            SaveFile();
        }
    }
    private int validate_file()
    {
        // Code to test if FileUpload1 has the file or not
        if (FileUpload1.HasFile)
        {
            Panel1.Visible = true;
            return 1;
        }
        else
        {
            Label2.Text = "No File Uploaded";
            // Color.Red will be called by namespace System.Drawing
            Label2.ForeColor = Color.Red;
            return 0;
        }
    }
    private void SaveFile()
    {
        File_Upload_Status.Text = "Valid FIle";
        Image1.ImageUrl = "~//images//success.png";
        //Invoking the saveas method which saves the file in the directory
        FileUpload1.SaveAs(Server.MapPath("~/uploads/" + FileUpload1.FileName));
    }
    private void GetFileDetails()
    {
        // Path will be called by using System.IO namespace
        string FileExtension = Path.GetExtension(FileUpload1.FileName);
        int FileSize = FileUpload1.PostedFile.ContentLength;
        Label11.Text = FileUpload1.FileName;
        Label12.Text = (FileSize/1024) + "KB";
        Label13.Text = FileExtension;
        // Using only ".pdf" extension, but you can use all the file extensions using if-else statement.
        if (FileExtension.ToLower() == ".pdf")
        {
            Image3.ImageUrl = "~//images//pdf.png";
            Label14.Text = "PDF file";
        }
    }
We will discuss about our first validation (empty file validation) in our next tutorial.