C to C++ and C++ to Java:
C was a powerful programming language but used structural approach. So when the length of code exceeded a particular no. of lines, the code became unmanageable. So this led to Object Oriented Programming techniques and birth of C++. But C++ compilers at that time were not platform independent. You needed a different code for Windows, different for Mac, Unix and other operating systems. Today programs written in C++ are also categorized by 32 and 64 bit versions. So C++ followed the W.O.C.A. principle, i.e. Write Once, Compile Anywhere. The main focus was to create programs which could execute on any platform and any O.S. These forces led to the development of Java (originally called as ‘Oak’) which followed W.O.R.A. principle, i.e. Write Once, Run Anywhere.
Where the Magic lies?
So what magic is there in Java which was not in older languages? Basically all the older compilers compile the source code (program) to native executable file (like .exe in windows). Here ‘native executable file’ means a file which is created for some target OS and is ready to execute on that OS. So we need to create a different ‘native’ file for different OS and different processor architectures (32 and 64 bit).
But in Java, the code is not directly compiled to native executable. The output of java compiler is a .class file, irrespective of OS / processor architecture. This .class file is a set of optimized instruction for a virtual machine called JVM (Java Virtual Machine). The creators of Java implemented this virtual machine (JVM) for different operating systems. So now the programmers need not worry about the target operating system or processor. They just have to write the code and install JVM on the target system, JVM handles the rest.
Understanding Simple Java Terms:
JVM is simply a virtual machine included in JDK as well as JRE.
JDK is Java Development Kit for Java Developers. It includes Java Runtime Environment(JRE) and all other related tools needed by developers.
JRE is Java Runtime Environment. It excludes the development tools and encapsulates only runtime environment. When you create a java application for a client, just install JRE on client side and your application will execute.
Remember, Java code is platform independent but Java Runtime Environment is specific for each platform.
+-----------------------------------------------------------------------+ |
Downloading & Installing JDK
Download JDK from here.
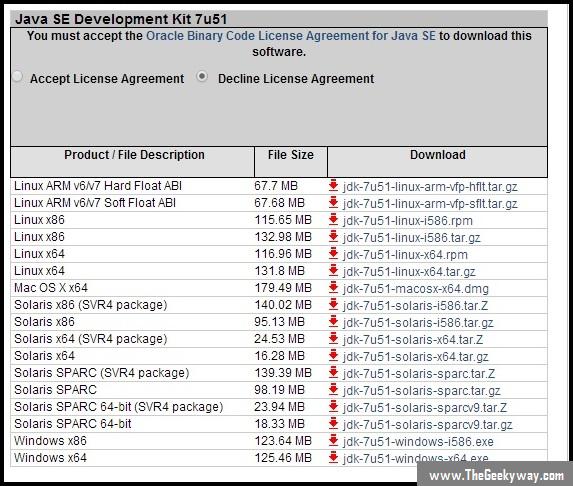
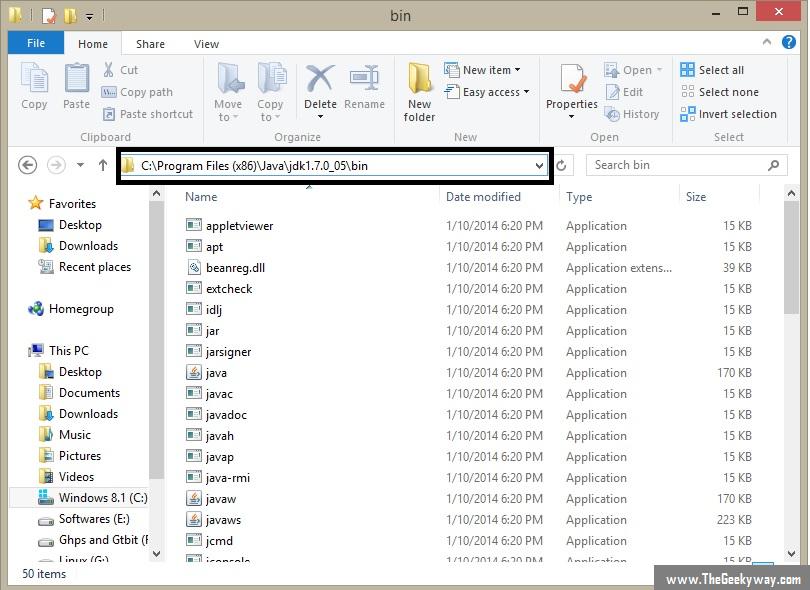
Scroll down to see screen as shown above. Accept the License Agreement to start download. As you can see, JDK is implemented for almost all major operating systems. After downloading, install JDK with default settings. After installation, go to
C:/program files/java/jdk\<version_name>/bin/
Make sure ‘javac’ and ‘java’ are present in this folder. Now copy the complete path from the address bar of explorer as shown in the pic below.
Now, follow these steps
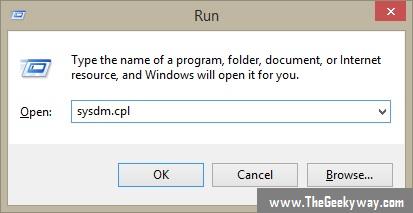
Go to Start Menu -> Run. Type ‘sysdm.cpl’ and press OK. You get the following screen.
 Click on ‘Advanced’ tab and then on Environment Variables button.
 You will get following screen now

Create a new user variable using button as shown above. Write the following values in text field provided.
Variable name : path
Variable value : \<text you had copied>.
Press OK to save and close all previous dialog boxes.
Now your Java Environment Variable is set and if you have followed the steps correctly, you will be able to compile and run java applications. To check if you have followed the above procedure correctly, goto start menu -> Run and type
java and press enter, if you get a flashing black screen, type
javac and press enter, if you still get a flashing black screen, it means the variables are correctly setup. If you get some error when you type java or javac, you might have done some mistake in setting up variable. It’s better to restart your computer and try again.
The next tutorial describes creating your first simple Java program.
Posted By: Sanyam Khurana
The Geeky Way is founded by Sanyam Khurana. He graduated from Georgia Tech, Atlanta, US with a Master's degree in Computer Science. He goes by 'CuriousLearner' all over the web & has spoken at many international conferences. He likes to contribute to FOSS. He is listed as an individual contributor of the Django project, bug-triager for CPython & has his name listed in the credits section of every browser ever released by Mozilla. In his free time, he likes to improve his guitar skills or binge-watch series.. You can find him on Twitter