If you are visiting this page for the first time then you must visit part 1 of the tutorial
on how to upload a file on server here
Contents of this 5 part tutorial
Part 1 : Basics of ASP.Net file uploading, uploading a file to a server.
Part 2 : ASP.Net file uploading using EmptyFile Validations.
Part 3 : ASP.Net file uploading using FileSize validation.
Part 4 : ASP.Net file uploading using FileExtension validator.
Part 5 : Complete ASP.Net file uploading using all the Validations one at a time.

*File Upload in asp.net : v1.2 (File Size Validation)*
File upload limit is one of the important controls for file upload control, if file upload control is not provided in uploading of file then there can be huge files uploaded which can kill the server cache. There is neither a javascript function which can provide access to client side and get the file size.
This is basically an upgrade to our v1.1 of our file upload system. So now server can check for whether a file is uploaded and can also check the file size. There are 2 steps for limiting the file size, first we have to declare \<httpRuntime> element in our web.config file and then creating a C# code.
The attributes of httpRuntime element are
   executionTimeout = "HH:MM:SS"
   maxRequestLength = "number"
   requireRootedSaveAsPath = "[True|False]"
   enable = "[True|False]"
   sendCacheControlHeader = "[True|False]"
   shutdownTimeout = "HH:MM:SS"
   delayNotificationTimeout = "HH:MM:SS"
   minFreeThreads = "number"
   minLocalRequestFreeThreads = "number"
   appRequestQueueLimit = "number"
   enableKernelOutputCache = "[True|False]"
   enableVersionHeader = "[True|False]"
   apartmentThreading = "[True|False]"
   waitChangeNotification = "number"
   maxWaitChangeNotification = "number"
   enableHeaderChecking = "[True|False]"
   requestLengthDiskThreshold = "number"
   useFullyQualifiedRedirectUrl = "[True|False]"
Step 1 : Configuring the web.config file.
The web.config gives us httpRuntime element. The attribute executionTimeout and maxRequestLength is required for this purpose but you can explore other options also. The default size for maxRequestLength is 4MB. Here is the screenshot of web.config file :-

here executionTimeout = "999" means that the file will upload for 999 seconds if the upload time is greater than 999 seconds then the upload will fail and connection will reset, and maxRequestLength = "2097151" means that it will upload max of 2097151KB or 2GB.
Step 2 : C# coding.
Since web.config is configured now we have to code the C# file.
The C# code is :-
private int checkFileSize()
{
Panel1.Visible = true;
int filesize = FileUpload1.PostedFile.ContentLength;
Label8.Text = (filesize)/1024 + "Kb";
if (filesize < 1048576)
{
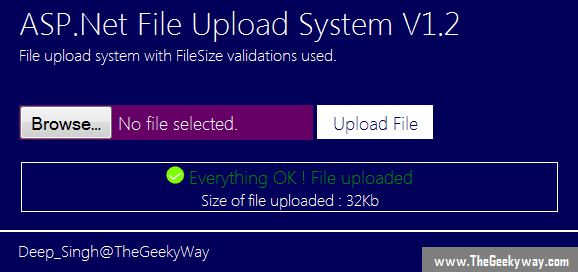
File_Upload_Status.Text = " Everything OK ! File uploaded ";
Image1.ImageUrl = "~//images//success.png";
File_Upload_Status.ForeColor = Color.Green;
// Provide upload code (discussed in part 1 of this tutorial)
return 1;
}
else
{
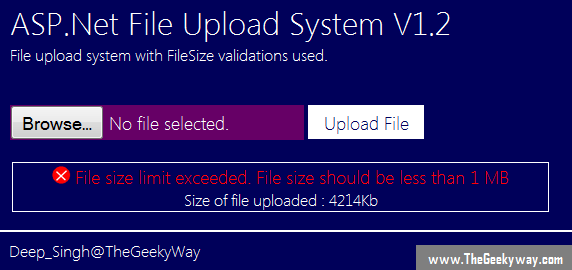
File_Upload_Status.Text = " File size limit exceeded. File size should be less than 1 MB ";
File_Upload_Status.ForeColor = Color.Red;
Image1.ImageUrl = "~//images//not_success.png";
return 0;
}
The output of the above C# code is :-
That's all for the FileSize validation. In the next section we will discuss about the FileType or FileExtension validation.
Posted By: Sanyam Khurana

The Geeky Way is founded by Sanyam Khurana. He graduated from Georgia Tech, Atlanta, US with a Master's degree in Computer Science. He goes by 'CuriousLearner' all over the web & has spoken at many international conferences. He likes to contribute to FOSS. He is listed as an individual contributor of the Django project, bug-triager for CPython & has his name listed in the credits section of every browser ever released by Mozilla. In his free time, he likes to improve his guitar skills or binge-watch series.. You can find him on Twitter